Pages

May 19, 2013

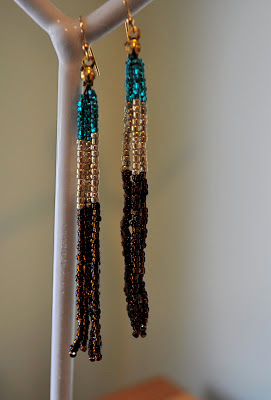
Tri-Color Tassels

Some more tassel earrings! Hurray!

These are super simple DIY earrings made from string and 3 colors of seed beads.
my DIY earrings

What you need:
-2 earring hooks
-2 bead tips
-nylon string (preferably in the color of the lowest color bead, in this case, brown)
-3 colors of seed beads (or more if you'd like).
-needle
-scissors
-pliers

First, cut 10 pieces of nylon string, about 4 to 5 inches each, depending on how long you want the tassle.
Then, string one bead of the last color onto one end of a cut nylon string.  Pull bead to middle and fold in half.
After folding the string in half, you can put a the two string-ends through a needle to make your life easier.  String all the following beads onto the needle so the first bead is stuck at the bottom (and no knot is needed at end to keep the beads on!).
Put as many beads of each color as you like.  Lots of freedom here!
Leave yourself plenty of room at the top.
Make 10 of these beaded strings.
With 5 beaded strings, slip the remaining string through the bead tip.  Knot the tops of the strings well so they cannot slip through the bead tip.  Cut the excess string.  Use the pliers to close the bead tip.
Repeat with the second set of 5 strings.
Use the pliers to open the bottoms of the earring hooks and slip on the bead tips.  Use pliers to close earring hooks.
All done!                   
                                          Wearing my DIY creation:

The most time consuming part of this DIY is definitely stringing all of the seed beads!

May 3, 2013

Braced with Chain and String

Can't believe it's been over a month since I was home.  And can't believe it's taken me this long to write up another blog post!  Life here is busy to say the least.

Before I went home, I had been seeing these bracelets at fancy stores all over the place.. selling for at least $25 each.  Recognizing that they are just chain, suede string, and some connecting pieces, I of course exclaimed, "wait, I can make this!".

I had been unable to find chain that was thick enough for the purpose of these bracelets at my local craft store.  I therefore waited until my trip to America to really scour the craft stores for the right materials for this project.

The bracelet took under 30 minutes to make; I ended up making a bunch of them!

Here's what you need:
- 2 pieces of chain (about 8-10 inches, depending on your wrist).
- Suede string, 2.5 times the length of your chain.
- lobster clasp and jump rings
- craft glue
- pliers
- scissors

What to do:
1. Using a jump ring, attach the first links of the two chains together.
2. Lay the chains down so that they are flat and the links line up to one another.
3. Start weaving the suede string between the links (in, over, under).
4. Once you've weaved through a few links, glue the tail of the suede string to itself.  (Do this on the side of the bracelet that will face your wrist, so that it will not be seen when you wear it.)
5. Continue weaving the suede string the same way between the links of the two chains.
6. At the end, once again connect the last two links with a jump ring.  Again, glue the suede string to itself on the side facing your wrist.
7. Cut any extra suede string from either side, once the glue has dried.
8. Open one of the jump rings on one end and add a lobster clasp.  Close the jump ring.
9. On the other end, attach as many extra jump rings as necessary to allow ease of putting on the bracelet!

With buying most of the supplies in bulk packs from the craft store, the bracelets ended up only costing a few dollars each!

I ended up keeping one for myself and giving the rest as gifts.  Everyone loved them!